Haven't installed OpenClaw yet? Click here for one-line install commands
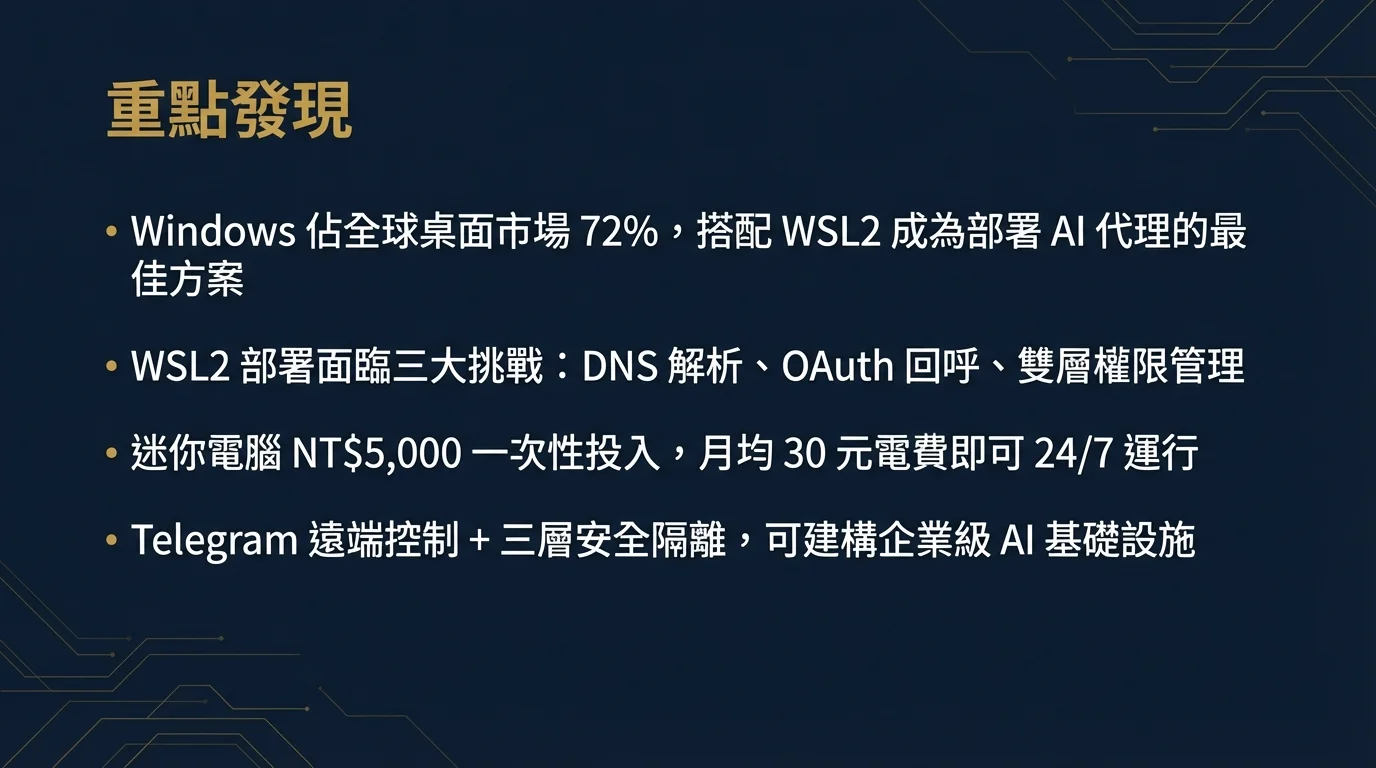
curl -fsSL https://openclaw.ai/install.sh | bashiwr -useb https://openclaw.ai/install.ps1 | iexcurl -fsSL https://openclaw.ai/install.cmd -o install.cmd && install.cmd && del install.cmd- Windows holds approximately 72% of the global desktop market share; combined with WSL2's full Linux kernel, it has become the most cost-effective solution for deploying OpenClaw AI agents[7]
- Deploying OpenClaw under WSL2 presents three major challenges -- DNS resolution failure, OAuth callback routing, and Windows/Linux dual-layer permission management -- this article provides root cause analysis and permanent fixes for each[3]
- Mini PCs (N100/N150 processors, 8GB RAM) can achieve 24/7 AI agent operation with a one-time investment of approximately NT$5,000 and monthly electricity costs of about NT$30[1]
- By combining Telegram remote control + Cron scheduling + three-layer security isolation (Windows account / Google account / Telegram 2FA), you can build enterprise-grade AI agent infrastructure[6]
| Path | Time | Description |
|---|---|---|
| One-Click Trial | 1 min | Don't want to set up an environment? Use ClawTank to launch instantly with no local installation required |
| Local Deployment | 1-2 hours | Jump directly to Section 4: Environment Setup to get started; refer back to background knowledge if you encounter issues |
| Full Read | 18 min | Start from the beginning -- understand WSL2 architecture and hardware selection before proceeding to hands-on work |
1. Windows + WSL2 Deployment Overview
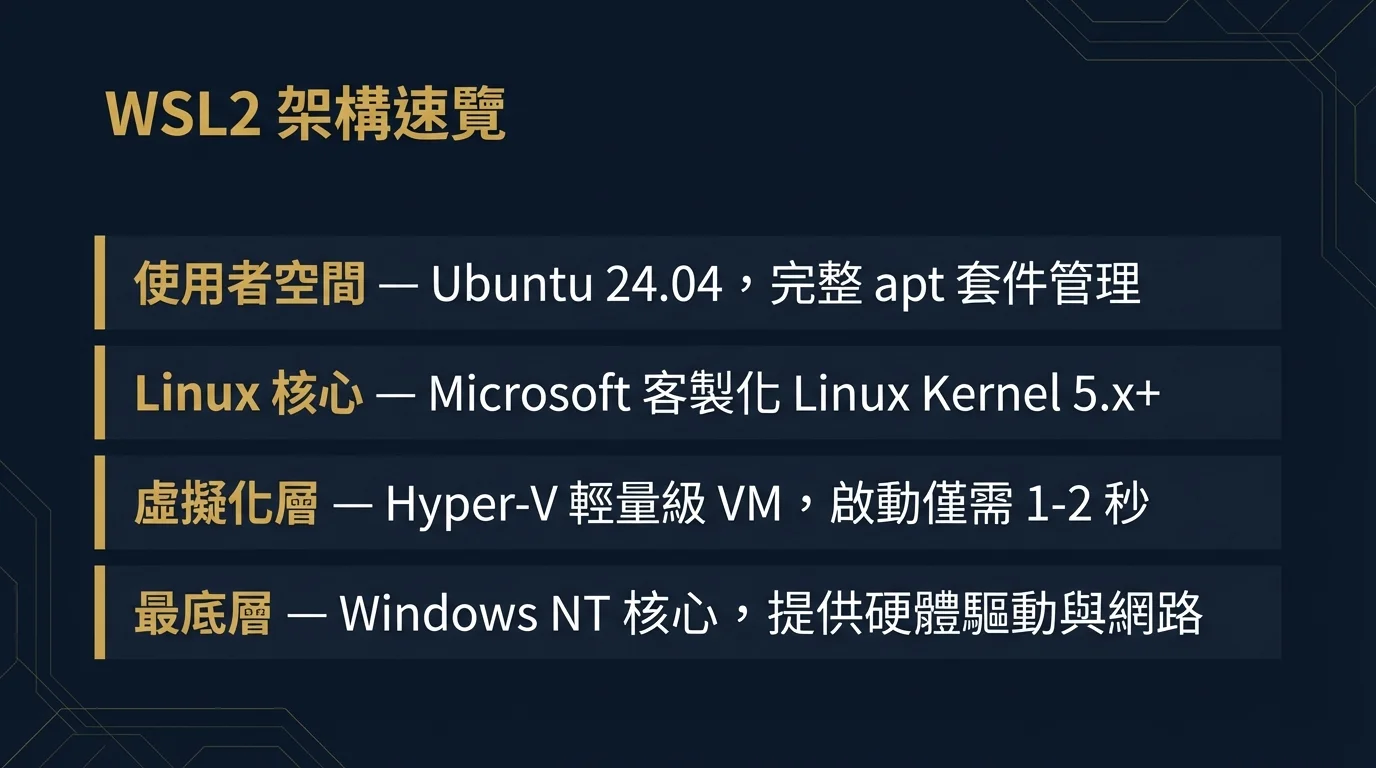
WSL2 gives Windows a full Linux kernel[2], allowing all native toolchains required by OpenClaw to run seamlessly. However, there are three common challenges to be aware of in the WSL2 environment: DNS resolution failure, OAuth callback routing issues, and Windows/Linux dual-layer permission management -- this article will break down each one and provide fixes.
2. WSL2 Architecture Quick Look
WSL2 is not a Linux emulation -- it is a real Linux kernel running on Hyper-V, booting in just 1-2 seconds.[2] Understanding this architecture is very helpful when troubleshooting issues:
| Layer | Technology | Description |
|---|---|---|
| Bottom Layer | Windows NT Kernel | Provides hardware drivers, network stack |
| Virtualization Layer | Hyper-V | Lightweight VM, boots in just 1-2 seconds |
| Linux Kernel | Microsoft Custom Linux Kernel | Full Linux 5.x+, supports cgroups, namespaces |
| User Space | Ubuntu 24.04 (default) | Full apt package management, systemd support |
Practical Notes:
- File System: In WSL2, use
/mnt/c/to access Windows files; in Windows, use\\wsl$\Ubuntu\to access Linux files. However, cross-system I/O is slower, so OpenClaw's working directory should always be placed under~/ - Networking: WSL2 connects to the Windows host via NAT[3], and automatic DNS configuration sometimes fails (Phase B provides the fix)
3. Hardware Selection
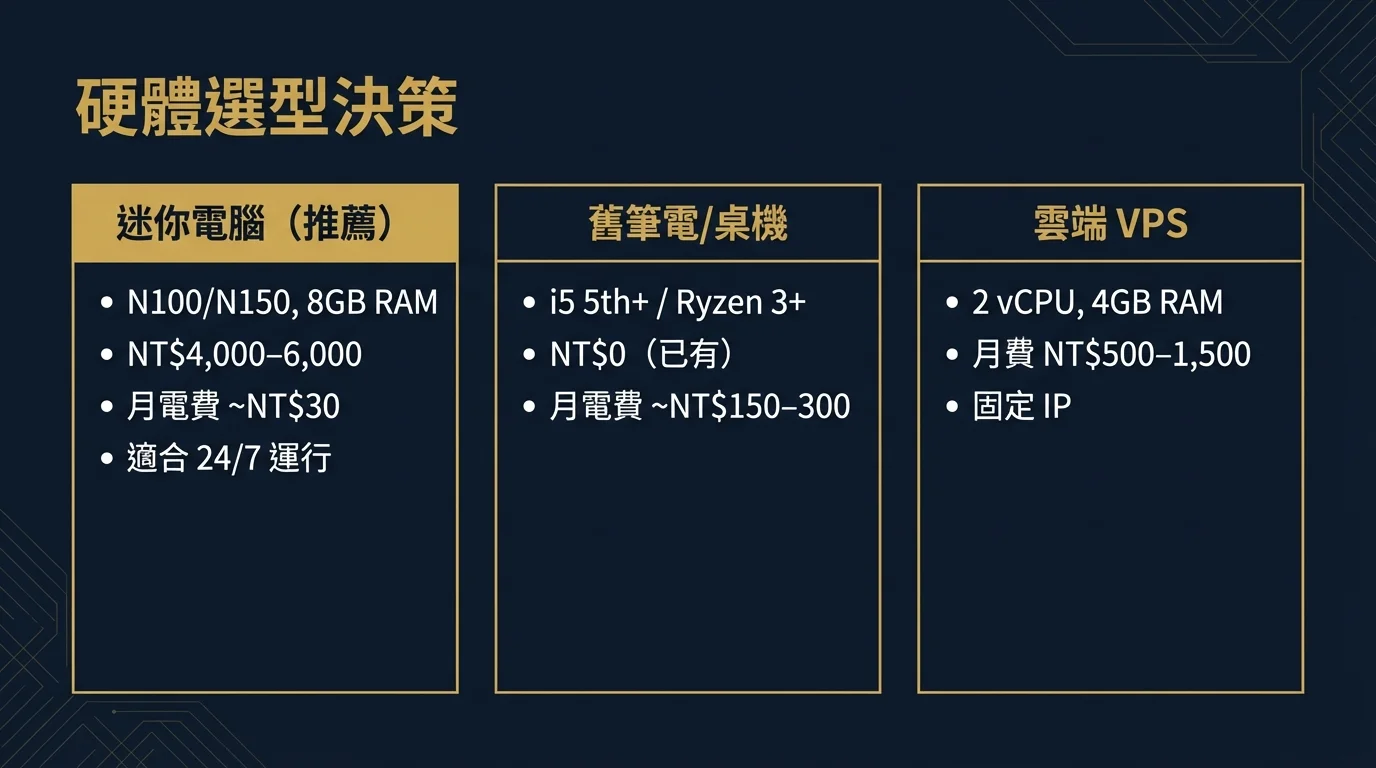
OpenClaw's core computation is handled by cloud AI models; the local machine only needs to stably run Node.js. Minimum requirements: 8GB RAM + 128GB SSD + stable network connection.
| Option | Typical Specs | One-Time Cost | Monthly Electricity | Use Case |
|---|---|---|---|---|
| Mini PC (Recommended) | N100/N150, 8GB RAM, 256GB SSD | NT$4,000-6,000 | ~NT$30 | 24/7 always-on operation |
| Old Laptop/Desktop | i5 5th+ / Ryzen 3+, 8GB RAM | NT$0 (already owned) | ~NT$150-300 | Testing and validation, non-24/7 |
| Cloud VPS | 2 vCPU, 4GB RAM | NT$0 | ~NT$500-1,500 | Static IP, multi-region deployment |
Essential for 24/7 Operation: Disable Windows automatic sleep, set BIOS to "AC Power Recovery -> Power On" (auto-restart after power loss), and ensure adequate cooling (ambient temperature < 35C).
4. Environment Setup: From Windows to OpenClaw Ready
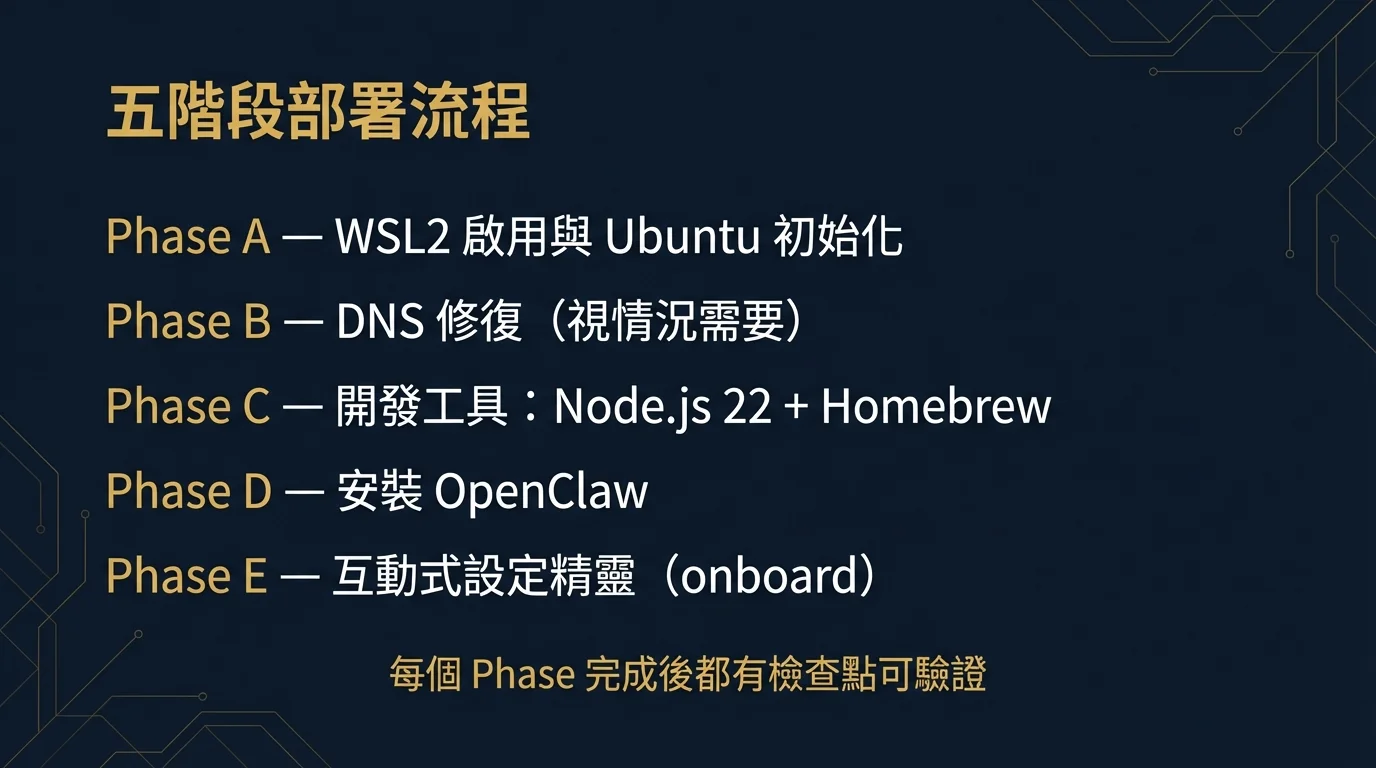
The deployment process is divided into five Phases, each with checkpoints for verification upon completion.
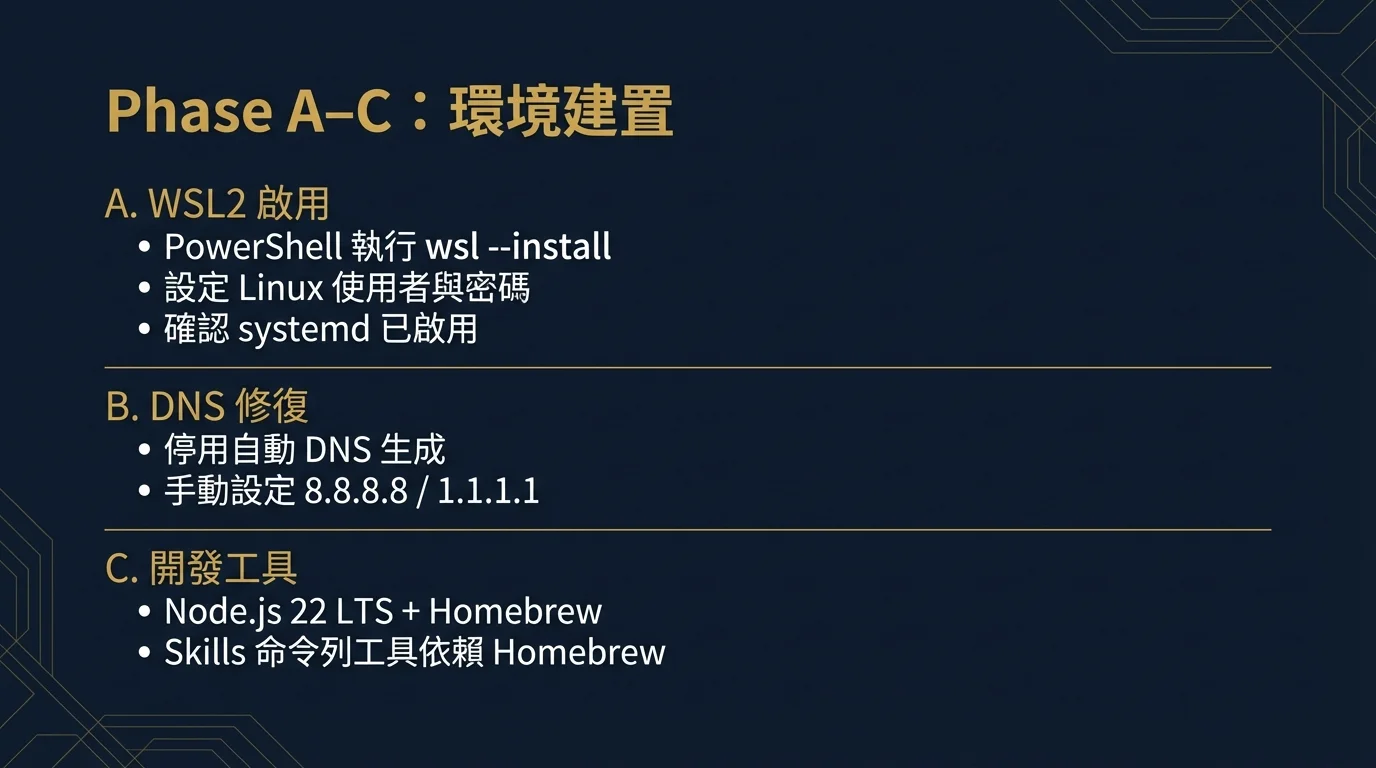
PHASE A Enable WSL2 & Initialize Ubuntu
Open PowerShell as Administrator and run:[2]
wsl --installThis command automatically enables Hyper-V, installs the WSL2 kernel, and installs Ubuntu (defaults to the latest LTS version). You will need to restart your computer after completion.
After rebooting, the Ubuntu window will pop up automatically, prompting you to set up:
- Username: Enter your desired Linux username (e.g.,
agent) - Password: Set a sudo password (needed for installing packages later)
Common Situation: First boot is root. If you installed a specific version using wsl --install Ubuntu-24.04, the first boot may not automatically show the user setup window and instead logs in directly as root. In this case, you need to manually create a user:
# Create user and set password
useradd -m -s /bin/bash agent
passwd agent
# Add to sudo group
usermod -aG sudo agent
# Set as WSL default user
echo -e '[user]\ndefault=agent' > /etc/wsl.conf
After configuration, run wsl --shutdown in PowerShell, then reopen Ubuntu to log in as agent.
Confirm systemd is enabled: OpenClaw's Gateway daemon requires systemd to function properly. Ubuntu 24.04 installed via wsl --install has systemd enabled by default, so manual configuration is typically unnecessary. You can verify with the following command:
cat /etc/wsl.conf
# Should show [boot] systemd=true
If your wsl.conf does not contain [boot] systemd=true (e.g., if installed with an older version of WSL), only then do you need to manually append it:
sudo tee -a /etc/wsl.conf <<EOF
[boot]
systemd=true
EOF
After modifying, you need to restart WSL (run wsl --shutdown in PowerShell, then reopen Ubuntu).
- Run
wsl --versionin PowerShell -> Should display WSL version number - Run
wsl -l -v-> Should show Ubuntu, Running, VERSION 2 - Run
whoamiin Ubuntu -> Should display your configured username (not root) - Run
systemctl --user status-> Should display State: running
PHASE B DNS Fix (If Needed)
First test whether your DNS is working -- most of the time this step is not needed:
ping -c 3 google.comIf it responds successfully -> Skip Phase B and proceed directly to Phase C.
If it fails (symptoms include apt update failing to connect, curl timeouts), this is a known WSL2 DNS issue.[3] The root cause is that the /etc/resolv.conf automatically generated by WSL2 fails in certain network environments (corporate VPN, company firewalls).
Permanent Fix (Two Steps):
# Note: If /etc/wsl.conf already has other settings (like [user], [boot]),
# use tee -a to append -- don't overwrite the entire file!
cat /etc/wsl.conf          # First check existing contents
sudo tee -a /etc/wsl.conf <<EOF
[network]
generateResolvConf = false
EOF# Remove the old auto-generated file
sudo rm /etc/resolv.conf
# Write Google and Cloudflare public DNS
sudo tee /etc/resolv.conf <<EOF
nameserver 8.8.8.8
nameserver 1.1.1.1
EOF
# Prevent it from being overwritten
sudo chattr +i /etc/resolv.confAfter completion, shut down WSL2 and reopen it (run wsl --shutdown in PowerShell, then open Ubuntu).
- Run
ping -c 3 google.com-> Should respond successfully - Run
sudo apt update-> Should connect to package servers normally
PHASE C Install Dev Tools: Node.js 22 + Homebrew
OpenClaw requires Node.js 22 LTS or above. Additionally, most Skills' command-line tools depend on Homebrew (such as gh, gog, sag, openai-whisper, uv, etc.). Make sure to install it at this stage; otherwise, during openclaw onboard you will encounter numerous "brew not installed" errors causing Skills to fail to install properly.[1]
# Update package list
sudo apt update && sudo apt upgrade -y
# Install build tools (needed for native addons of some npm packages)
# Note: Ubuntu 24.04 comes with curl and git pre-installed
sudo apt install -y build-essential
# Install Node.js 22 via NodeSource
curl -fsSL https://deb.nodesource.com/setup_22.x | sudo -E bash -
sudo apt install -y nodejs
# Verify
node -v   # Should show v22.x.x
npm -v # Should show 10.x.x# Install Linuxbrew
/bin/bash -c "$(curl -fsSL https://raw.githubusercontent.com/Homebrew/install/HEAD/install.sh)"
# Add to PATH (follow the instructions shown after installation)
echo 'eval "$(/home/linuxbrew/.linuxbrew/bin/brew shellenv)"' >> ~/.bashrc
source ~/.bashrc
# Verify
brew --versionWe strongly recommend installing Homebrew at this stage. Testing revealed that skipping Homebrew causes most Skills (github, gog, sag, openai-whisper, nano-banana-pro, etc.) to fail during openclaw onboard. While the core AI conversation functionality is unaffected, Skills are a key part of OpenClaw's value.
node -v-> Shows v22.x.xnpm -v-> Shows 10.x.xbrew --version-> Shows version number
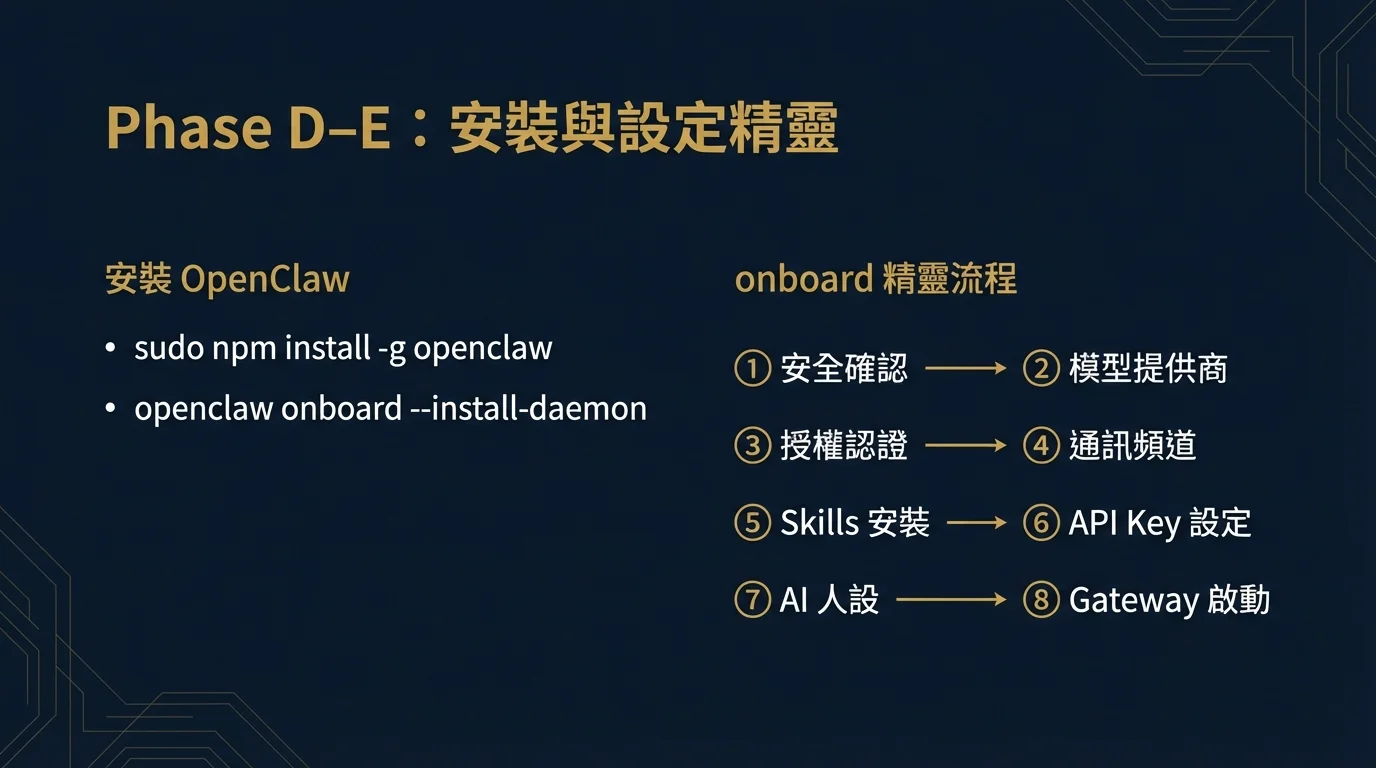
PHASE D Install OpenClaw
# Global install
sudo npm install -g openclaw
# Verify
openclaw --version
After installation, proceed directly to Phase E. You do not need to manually enable model provider plugins beforehand -- the openclaw onboard wizard will guide you through selecting a model provider and automatically handle the related configuration. Anthropic does not require an additional plugin (the wizard will guide you through entering a Token), and Qwen will automatically complete OAuth authorization during the wizard flow.
openclaw --version-> Shows version number
PHASE E Interactive Setup Wizard (onboard)
Everything is ready. Launch the setup wizard:
openclaw onboard --install-daemonThe --install-daemon flag will automatically register a systemd service after the wizard completes, keeping the Gateway running in the background and auto-recovering after system restarts -- no more needing tmux to maintain a foreground process. Phase A already confirmed systemd is enabled, and this step takes advantage of it.
openclaw onboard is an interactive wizard; use the arrow keys to select options and Enter to confirm.[1] Here is the complete wizard flow:
Step 1: Security Confirmation -- The wizard displays a security warning explaining that OpenClaw can read files, execute actions, etc. After reading, select Yes to continue.
Step 2: Model Provider -- Choose your AI model. For the trial phase, Qwen (free) is recommended; for long-term use, Anthropic is recommended.
Step 3: Authorization -- Depending on your chosen provider:
- Qwen: The wizard displays an OAuth authorization URL; open it in your Windows browser, log in to your Qwen account, and complete the authorization
- Anthropic: Paste your API Token (obtainable from Anthropic Console, or first run
claude setup token)
Step 4: Communication Channels -- The wizard lists all supported channels (Telegram, WhatsApp, Discord, Slack, etc.). Unconfigured ones will show "not configured," and those requiring plugin installation will show "install plugin to enable." To set up Telegram remote control, select Telegram and enter the Bot Token obtained from @BotFather. Skip any channels you don't need.
Step 5: Skills Installation -- The wizard automatically installs available Skills. If you installed Homebrew in Phase C, most Skills (github, gog, sag, openai-whisper, etc.) will install successfully. If you see "brew not installed" errors, it means Homebrew has not been installed -- you can finish onboarding first, then go back to Phase C to install Homebrew, and run openclaw doctor --fix to reinstall failed Skills.
Step 6: API Key Configuration -- Some Skills require external API Keys, and the wizard will ask for each one. Common ones include:
- GEMINI_API_KEY (nano-banana-pro skill): Obtainable for free from Google AI Studio
- NOTION_API_KEY (Notion skill): Create an Internal Integration at Notion Integrations
- OPENAI_API_KEY (openai-image-gen skill): Obtainable from OpenAI Platform
- GOOGLE_PLACES_API_KEY (goplaces skill): Obtainable from Google Cloud Console
If you don't have these Keys yet, select No to skip; you can add them later at any time using openclaw config set.
Step 7: AI Persona -- Customize the System Prompt to determine the agent's response style. You can use the default or create a custom one (e.g., "Please reply in English").
Step 8: Gateway Launch -- The wizard automatically starts the Gateway and generates a Dashboard link (with token), in a format like:
http://127.0.0.1:18789/#token=f5269e59d1294e367cde4f4a5b06230d3a80f54ed541794dCopy this complete URL and open it in your Windows browser to access the graphical control panel. Since WSL2 has no graphical interface, the wizard will also mention SSH tunnel access -- but when using the same computer, simply paste the URL in your Windows browser; no SSH tunnel is needed.
The wizard will also remind you to set up Web Search (requires a Brave Search API Key). If you don't need web search functionality for now, you can skip it.
After completion, verify manually:
# Confirm Gateway is running
openclaw gateway status
# Open terminal UI to test AI conversation (type a message and press Enter, Ctrl+C to exit)
openclaw tui| Purpose | Command |
|---|---|
| View token | openclaw config get gateway.auth.token |
| Open dashboard | openclaw dashboard |
| Regenerate token | openclaw doctor --generate-gateway-token |
| Health check | openclaw doctor --fix |
Web Search (Optional)
If you want the agent to be able to search the web, you need to set up a Brave Search API key; otherwise the web_search tool will not work:
openclaw configure --section webWant to modify settings later? Simply run openclaw onboard again at any time to re-enter the wizard.
openclaw gateway status-> Shows Runtime: runningopenclaw tui-> Opens terminal UI; AI responds normally after typing a message (Ctrl+C to exit)- Open the Control UI URL in your Windows browser -> You can see the control panel
Congratulations! At this point your OpenClaw is ready to use. The following sections cover advanced configuration and in-depth explanations -- read them as needed.
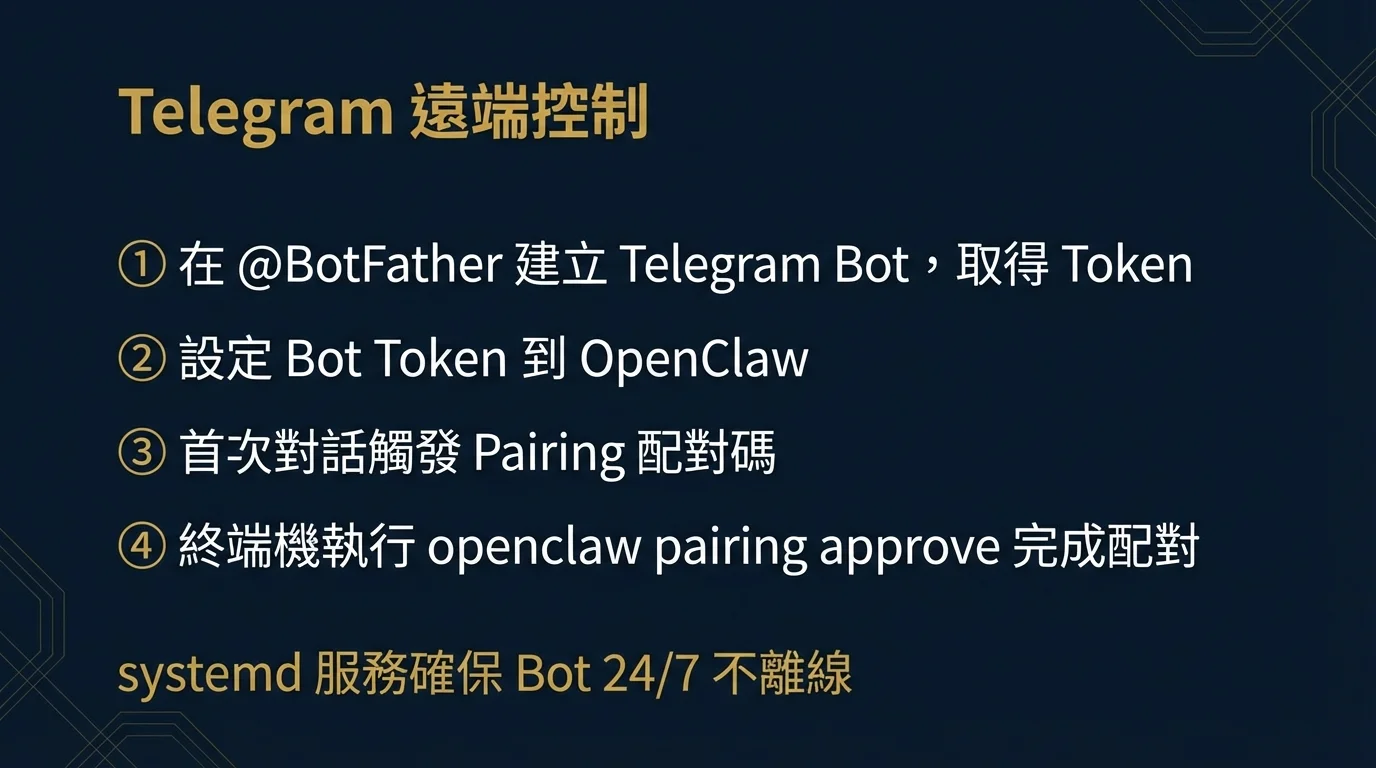
5. Telegram Remote Control: From Creating a Bot to Pairing Complete
Telegram is the simplest way to remotely control OpenClaw -- send a message on your phone and the AI agent will reply.[4] If you already set up a Telegram Bot Token during the onboard wizard, the Bot should already be running. This section provides the complete Telegram Bot creation flow and Pairing tutorial.
Step 1: Create a Telegram Bot
- Search for @BotFather in Telegram and start a conversation
- Send
/newbot - Follow the prompts to enter the Bot's display name (e.g.,
My OpenClaw) - Enter the Bot's username (must end with
bot, e.g.,my_openclaw_bot) - BotFather will reply with a Bot Token in a format like
7123456789:AAH...-- copy and save this Token
Step 2: Set the Bot Token in OpenClaw
If you already entered the Bot Token during the onboard wizard, you can skip this step. Otherwise, run the following in the Ubuntu terminal:
openclaw config set telegram.bot.token "YOUR_BOT_TOKEN"Then restart the Gateway for the settings to take effect:
openclaw gateway restartStep 3: First Conversation & Pairing
Find the Bot you just created in Telegram and send any message (e.g., "Hello"). The Bot will reply with the following:
OpenClaw: access not configured.
Your Telegram user id: 1186367637
Pairing code: 75AMN56Q
Ask the bot owner to approve with:
openclaw pairing approve telegram 75AMN56Q
This is OpenClaw's security pairing mechanism -- ensuring only authorized accounts can control the agent. Go back to the Ubuntu terminal and run the command provided in the Bot's reply:
openclaw pairing approve telegram 75AMN56QAfter successful pairing, send another message to the Bot in Telegram -- this time the AI will respond normally.
Step 4: Background Operation (Ensuring the Bot Stays Online)
If you used openclaw onboard --install-daemon in Phase E, the Gateway is already running as a systemd service in the background and will auto-recover after system restarts -- no additional setup needed. You can verify with the following commands:
# Check systemd service status
systemctl --user status openclaw-gateway
# Manually restart if needed
systemctl --user restart openclaw-gateway
Alternative: tmux manual management. If your environment does not support systemd (e.g., older WSL versions), you can use tmux instead:
# Install tmux
sudo apt install -y tmux
# Start Gateway in a tmux session
tmux new -s openclaw
openclaw gateway start
# Detach session (Ctrl+B then press D)
# Reattach: tmux attach -t openclaw
Windows Environment Special Considerations
- WSL2 shutdown = Bot goes offline: Ensure WSL2 keeps running. You can use
wsl --shutdownfollowed by reopening Ubuntu to reset state - Windows Update restarts: Set Windows Update's "Active hours" to prevent automatic restarts. After a restart, you need to relaunch WSL2 and the Gateway
- Auto-start on boot: Add
wsl -d Ubuntu -- openclaw gateway startto Windows Task Scheduler to automatically restore the Bot service on boot
For complete advanced Telegram settings, refer to the Telegram Integration Complete Guide.
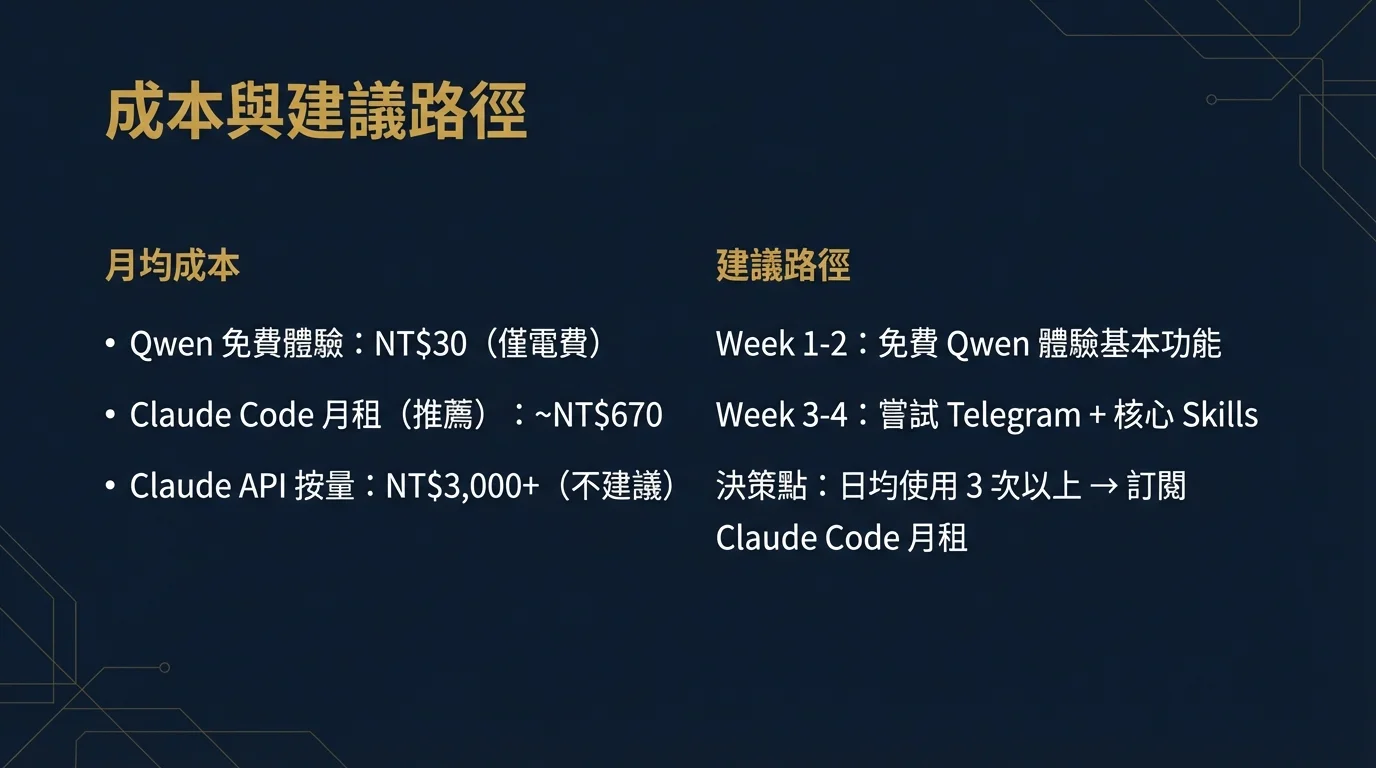
6. Model Strategy & Costs
The openclaw onboard wizard has already guided you through choosing a model provider. This section explains the actual cost differences between options to help you make a long-term decision.[9]
| Option | Monthly Cost | Usage | Use Case |
|---|---|---|---|
| Qwen Free Plan | $0 | Unlimited within free quota | Trial and exploration, light use |
| Claude Code Subscription (Recommended) | $20 USD | Generous usage quota included | Daily work, long-term deployment |
| Claude API Pay-per-use | Variable | ~$2-3 per 1-2 conversations | Not recommended -- extremely high and unpredictable costs |
Why is Claude API pay-per-use not recommended? Each conversation involves a large volume of context tokens; even simple commands can consume $2-3 per round trip. With just a few uses per day, the monthly bill easily exceeds $100. The Claude Code subscription at $20/month provides more than enough quota for most users.
Recommended Path: Start with Qwen free for 1-2 weeks -> Subscribe to Claude Code subscription after confirming your needs. When switching to Anthropic, first run claude setup token, then re-enter the openclaw onboard wizard and select Anthropic.
7. Skills & OAuth (WSL2 Special Handling)
Skills (Gmail, Calendar, Drive, Notion, etc.) can be selected for installation during the onboard wizard.[5] However, the WSL2 environment has a special challenge with OAuth authorization:
Since WSL2 has no graphical interface, during OAuth authorization the wizard will display an authorization URL. You need to:
- Copy the URL and open it in your Windows browser
- Log in to your Google account and authorize access
- The callback URL will be automatically captured by OpenClaw; if the callback fails, the wizard will prompt you to manually copy the authorization code and paste it back into the terminal
For the complete Skills list and advanced settings, refer to the Skills Ecosystem Complete Guide and the Notion Integration Guide.
8. Windows Environment-Specific Troubleshooting
Below are common issues organized by symptom. When encountering problems, we recommend first running OpenClaw's built-in diagnostic tool:[8]
openclaw doctor --fixThis command automatically detects and fixes most common issues. If doctor cannot resolve the problem, troubleshoot using the tables below:
DNS & Network Issues
| Symptom | Possible Cause | Solution |
|---|---|---|
apt update fails, curl times out | WSL2 automatic DNS configuration failed | Follow Phase B to manually configure DNS |
| WSL2 loses network after VPN connection | VPN overrides the virtual network interface | Modify /etc/resolv.conf to use VPN's DNS, or set [network] generateResolvConf = false in wsl.conf |
npm install stuck on idealTree | Slow DNS resolution or proxy issues | Set npm to use a public registry: npm config set registry https://registry.npmmirror.com |
Telegram Issues
| Symptom | Possible Cause | Solution |
|---|---|---|
| Bot does not reply to messages | Gateway is not started or has stopped | Check status with openclaw gateway status, restart with openclaw gateway restart |
| "Pairing Required" but approve fails | Pairing code has expired | Send a new message to trigger a new pairing code |
| Bot goes offline after Windows restart | WSL2 did not auto-start | Add wsl -d Ubuntu to Windows Task Scheduler |
Permission & Plugin Issues
| Symptom | Possible Cause | Solution |
|---|---|---|
sudo npm install -g permission error | npm global path permission issue | Use sudo or switch to nvm to manage Node.js |
OAuth callback localhost cannot connect | WSL2 port not forwarded to Windows | Manually copy the authorization code, or set up netsh port forwarding |
/etc/resolv.conf gets overwritten after restart | Forgot to configure wsl.conf or chattr | Re-run the complete Phase B steps |
| Skills installation reports "brew not installed" | WSL2 does not have Homebrew installed | Follow Phase C to install Linuxbrew -- most Skills' CLI tools depend on Homebrew |
systemctl commands fail | WSL2 systemd not enabled | Add [boot] systemd=true to /etc/wsl.conf, then wsl --shutdown and restart |
Performance Issues
| Symptom | Possible Cause | Solution |
|---|---|---|
| WSL2 uses too much memory | Linux cache mechanism | Create %UserProfile%\.wslconfig and set [wsl2] memory=4GB |
| Slow file operations | Cross-filesystem access | Place OpenClaw's working directory under ~/, not /mnt/c/ |
| CPU spikes after Gateway starts | Antivirus scanning WSL2 files | Add the WSL2 path to your antivirus exclusion list |
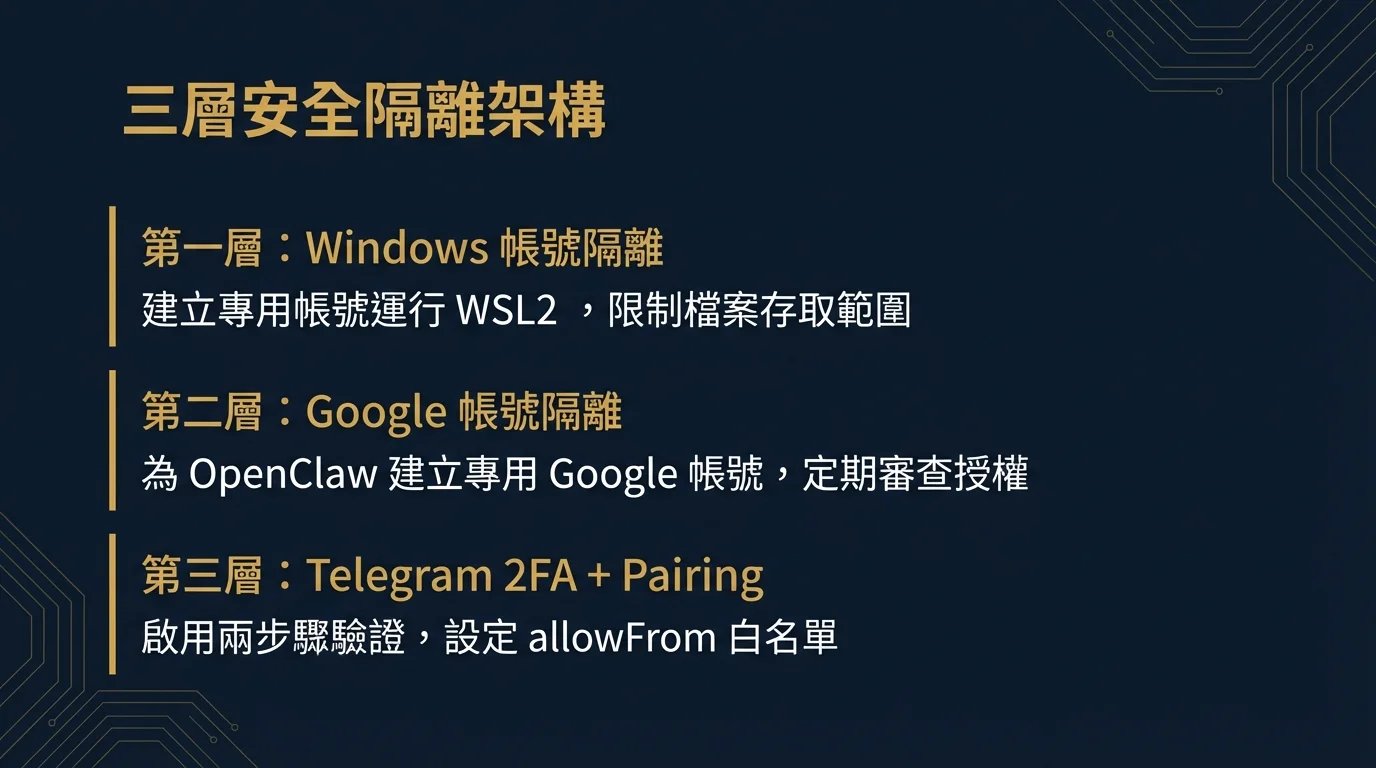
9. Security Framework
An AI agent can access your email, calendar, and files -- security is a critical aspect of deployment that should not be overlooked.[6][10] Below is the recommended three-layer isolation architecture:
Layer 1: Windows Account Isolation
- Create a dedicated Windows local account to run WSL2 (not your daily-use administrator account)
- This account does not need administrator privileges
- Restrict the file access scope of this account
Layer 2: Google Account Isolation
- Create a dedicated Google account for OpenClaw; do not use your primary account
- Only place files that the agent needs to process in the OpenClaw-dedicated account's Google Drive
- Use the Google account's "Third-party app access" settings and regularly review authorizations
Layer 3: Telegram 2FA + Pairing
- Enable Telegram's Two-Step Verification
- OpenClaw's Pairing mechanism ensures only verified accounts can control the agent
- Set an
allowFromwhitelist to restrict which Telegram User IDs can interact
API Key Management
- Do not write API Keys into
.bashrcor any version-controlled files - OpenClaw's
config setstores keys in~/.openclaw/openclaw.json; ensure this file has600permissions:
chmod 600 ~/.openclaw/openclaw.json- Rotate API Keys regularly (recommended every 90 days)
Advanced: Docker Container Isolation
The three layers above focus on access control (who can operate the agent), but the community is often more concerned with execution isolation -- will commands executed by the agent affect the host system? OpenClaw supports Docker sandbox mode, which fully encapsulates the agent's execution environment in a container: file operations are restricted to the container scope, network access can be controlled via Docker network policies, and even if the agent behaves abnormally it will not impact the host. For detailed Docker Compose deployment and security architecture, refer to the Security Deep Dive, Section 2.4: Docker Sandbox.
10. Cost Structure & ROI Analysis
The total cost of deploying OpenClaw consists of two parts:
One-Time Investment
| Item | Mini PC Option | Old Computer Option | Cloud VPS |
|---|---|---|---|
| Hardware | NT$4,000-6,000 | NT$0 | NT$0 |
| Windows License | Usually included | Already owned | N/A |
| Setup Time | ~1-2 hours | ~1-2 hours | ~30 minutes |
Ongoing Monthly Costs
| Item | Trial Phase (Qwen) | Production Use (Claude Code Subscription) | Not Recommended (Claude API Pay-per-use) |
|---|---|---|---|
| Electricity (Mini PC) | NT$30 | NT$30 | NT$30 |
| AI Model Cost | NT$0 (Free) | ~NT$640 ($20 USD) | NT$3,000-10,000+ |
| Monthly Total | NT$30 | ~NT$670 | NT$3,000+ |
Why is Claude API pay-per-use not recommended? Each OpenClaw conversation sends the full context (system prompt, conversation history, tool definitions); even a simple command consumes far more tokens than expected. In testing, 1-2 conversations using the Claude API could cost $2-3. With several uses per day, the monthly bill easily exceeds $100 USD. The Claude Code subscription plan offers generous usage at a fixed $20/month, making it the most cost-effective long-term option.
Cost Comparison with Other Options
| Option | Monthly Cost | Automation Capabilities | Customization |
|---|---|---|---|
| ChatGPT Plus / Claude Pro | ~NT$640 | None (chat only) | Low |
| OpenClaw + Qwen | NT$0 | Full (Cron, Telegram, Skills) | Full |
| OpenClaw + Claude Code Subscription | ~NT$640 | Full | Full |
| OpenClaw + Claude API | NT$3,000+ | Full | Full |
For the same monthly cost (~NT$640), ChatGPT Plus only provides a chat interface; while OpenClaw + Claude Code subscription can not only chat but also automate scheduling, remote control, and access your email and calendar -- the ROI difference is clear.
"POC First, Then Decide" Framework
For users in the evaluation phase, we recommend the following path:
- Week 1-2: Install WSL2 + OpenClaw on your existing computer, paired with the free Qwen model to experience basic features, zero-cost entry
- Week 3-4: After confirming your use cases, try Telegram remote control and one or two core Skills
- Decision Point: If daily usage frequency reaches 3+ times per day, subscribe to the Claude Code plan ($20 USD/month) and invest in a mini PC for 24/7 deployment
Conclusion
Windows + WSL2 has lowered the barrier to deploying AI agents to an unprecedented level -- no Linux experience required, no high-end hardware needed, no cloud infrastructure necessary. A mini PC costing about NT$5,000, plus a few hundred NT$ per month in API costs, gives you a 24/7 personal AI assistant.
This article covered the three major challenges (DNS, OAuth, remote management) that are the most common stumbling blocks in Windows environments. With this knowledge, you can complete a full deployment from zero to running in a single afternoon.
If you want to quickly try it out, or prefer not to go through the tedious environment setup and ongoing maintenance, you can also consider using the one-click ClawTank -- start using OpenClaw within one minute with no local installation required.
Want to learn more about OpenClaw's advanced features? We recommend continuing with the Skills Ecosystem Complete Guide to explore more automation possibilities, or check out the Security Deep Dive to strengthen your deployment security.
Presentation Slides